


Crunchy, Smoky, Juicy Birria Beef Tacos
- Heather Arcay
- Jul 13, 2021
- 4 min read
Get a taste of the birria taco craze, they are being raved about for a reason. This is a sensory overload!

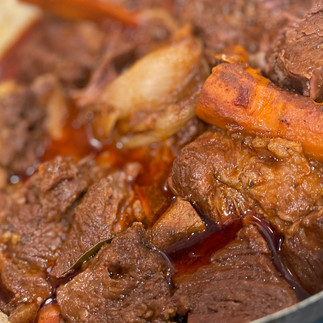
This is a recipe for the light-hearted foodie! No reservations can be pondered when you begin devouring this tender adobe braised beef, stuffed into a crispy fat fried corn tortilla with melted creamy cheese, sprinkled with chopped red onions and fresh cilantro... then you hit it with a few squirts of bright tangy lime wedges and it's game over. The smoky chilis that are blended into this liquid are just mind-blowing! I'm salivating now thinking about it! You'll want seconds then thirds and if your like my husband, even fourths! I had to pry him off of these things!
This dish is said to have been recreated in Mexico in the 60's at a street cart and with some adjustments became the taco it is today. It's origin is with goat meat and then was adjusted to be more like a beef stew. In the 80's it became extremely popular, then even more so in the recent years when the recipe was shared in the states. It's been a huge hit in the food truck craze and you'll know why once you taste it. There are several variations of this iconic dish, so by all means, try this out and compare to other versions and decide what works best for you. I can only imagine that you'll be in love like we are. Also, remember to visit your local Mexican restaurants(their food is amazing) and check out the menu, you may get lucky and find birria!
This recipe is easy to make but it takes some time so start early and be patient, we're talking about 3.5 hours to get the right tenderness. You can't rush perfection! Read the instructions so you have have everything in place and ready to go when you need it.
Pro tip: Have plenty of napkins available... it's a good messy!
SERVING SIZE -
YIELD: Approx 20-25 tacos
PREP TIME: 15 min
COOK TIME: 3.5 hours
NOTE: I HIGHLY RECOMMEND USING A 7QT. OR LARGER CAST IRON DUTCH OVEN WITH LID
If you don't have one, you may use a large 7qt. or larger pot with tight fitting lid. Do not use smaller or your going to boil over.
INGREDIENTS
Meat braising
4.5 lbs Chuck roast, cut into 3" - 4" pieces
2lbs Short ribs, bone-in
7 ea New Mexico Chillis, dried, tops cut off and remove seeds
1 ea Large carrot, peeled, sliced in half, then lengthwise
1 ea Garlic, keep as whole head, cut top off (keep top for future stocks in freezer)
1 ea Large onion, peel outer skin, slice in half from center of root to tip
4 ea Bay leaves
3 T Better Than Bouillon Roasted Chicken Base (a pantry must have!)
1 tsp Apple cider vinegar
1.5 tsp Mexican oregano (worth it, different aroma and flavor from Italian oregano)
1 tsp Cumin, ground (if you have seeds, throw them in the spice grinder or mortar and pestle to a fine powder)
1 tsp Chili powder
1 tsp Kosher salt
8 cups Water
Taco production
1 ea Pack of small size, taco tortillas, corn or flour, your taste preference but corn is better in my opinion (this recipe can make at least 20 tacos)
1 ea Bunch of cilantro, chopped or whole by your preference
1 ea Small red onion, small dice
1 cup Cheese of choice, grated, we used Daiya Jalapeno Havarti Block (optional)
½ cup Fat liquid, skimmed from the top of finished meat braising above (used to fry tacos)
1 cup Strained braising liquid from finished meat above, removed fat as much as possible (dipping tacos as a sauce)
INSTRUCTIONS - Read all before starting. Preparation is key.


Meat braising
Place in the pot, meat, chilis, onion, carrot, garlic, bay leaves, chicken base, vinegar, oregano, cumin, chili powder, salt and water.
Bring to a boil, then rapid simmer for 30 min to tenderise the chiles. Remove any foam that boils to the top and discard.
After 30 min, remove chilis into a blender with ½ cup stock. Blend until smooth.
Return the sauce to pot and mix well.
Cover and simmer for 2.5 hours. Check occasionally and reposition any ingredients, that need more submersion with tongs.
Taste broth and adjust seasonings to taste with salt or chili powder. Cover and simmer for the final 30 min. Test the meat with a fork for that sexy and easy to fall apart goodness. You'll know.
Taco production
Turn off the heat and skim with a ladle, 1/2 cup of fat from the top into a bowl. This will be to fry tacos in. Set frying fat aside.
Next, in a large container with a lid, begin placing piece by piece, the tender beef while removing fat and shredding with two forks as you go. Ladle some broth over. Cover and set aside.
Using a medium sized bowl, set a fine mesh strainer over it. Carefully, empty the contents of the broth pot into the strainer. This will be hot, use good protection for your hands and/ or have another person assist. Discard remaining solids or eat if desired.
From the strained liquid broth, skim the remaining fat from the top and put into the bowl with the frying fat. The remaining liquid is now your dipping sauce for the tacos, YUM! Set aside.
In a large frying pan over medium heat, place about 1 tsp of frying fat in pan.
Place tortilla over the fat with tongs and swirl it over the fat on both side to cover. Careful! The tortillas become more fragile when wet.
Let fry until golden brown and crispy on both sides. Repeat with as many tortillas that can comfortably fit.
If using cheese, before removing a tortilla, sprinkle grated cheese and melt slightly.
On a large tray, lined with paper towels, place and carefully fold each crispy tortilla over into a taco form while still pliable. Continue until you have the desired amount of tacos.
Then, stuff fried shells with shredded birria meat. Reheat the meat first if necessary.
Add diced red onion and cilantro to all tacos.
Serve birria tacos while hot with a side of fresh lime wedges for your guests to squeeze as desired along with a side dish of hot broth for dipping. ENJOY, we certainly did!


Comments